The rear-end differential is one of the more physically imposing components on any car, truck or SUV. Although it's designed to last the lifespan of the vehicle, this unit typically takes quite a beating and is prone to common wear and tear issues that plague most mechanical components. The housing is made from high-strength steel and protects the rear-end gears and axles from being exposed to the elements. However, in most cases, the part of the rear differential that becomes damaged is the differential gasket.
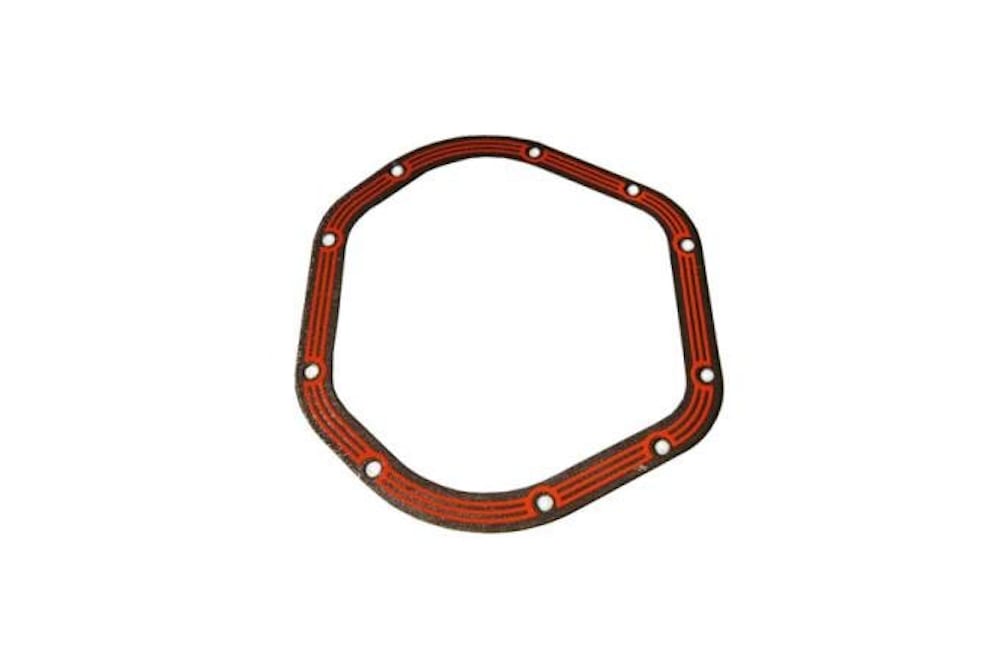
The differential gasket is the gasket that seals the differential housing. It's typically manufactured out of cork, rubber, or an oil-resistant silicone that seals the two-piece differential case. This gasket is intended to keep rear-end grease and oil contained within the housing but also reduce dirt, debris or other harmful particles from entering the rear end differential. Rear end oil and grease is essential in properly lubricating the ring and pinion gears that supply power to drive axles.
When this gasket fails, the lubricants will leak from the rear end housing and can cause these expensive components to wear out or break entirely.
It's very rare that the differential gasket wears out or breaks. In fact, some differential gaskets made in the 1950s and 1960s are still on their original vehicles. However, if a problem does occur with the gasket, like any other mechanical defect it will display a few common warning signs or symptoms that should alert the vehicle owner that a problem exists.
Some of the common warning signs of a damaged or broken differential gasket include:
Traces of rear-end oil or grease covering the differential housing: Most differentials are circular in shape while some may be square of octagon-shaped. Regardless of their size, the one similarity that all differentials have is that the gasket encapsulates the entire circumference. When one part of the gasket fails, either due to old age, or exposure to elements, oil within the differential will leak and typically coat that part of the differential. Over time, the gasket will continue to fail in multiple spots or the oil will leak and coat the entire differential housing.
Puddles or small drips of rear end lubricants on the ground: If the gasket leak is significant, oil will leak from the differential and can drip onto the ground. In most cases, the differential in the rear end will drip rear end oil in the center of the vehicle; where the housing is typically located. This oil will be very dark and has a very thick feel to it when touched.
Howling sounds come from the rear of the vehicle: When oil and lubricants leak from the differential gaskets, it can create a harmonic "howling" or "whining" sound to occur. This is a sign of a significant problem with the rear end gears and could lead to component failure. Essentially, the howling sound is caused by metal to metal grinding together. As oil leaks from the housing, it fails to lubricate these expensive components.
Any of these above warning signs or symptoms should alert any vehicle owner that a problem exists with the rear end differential. In most cases, the differential can be taken apart and the gasket replaced without having to remove the rear end from the vehicle. If the damage is significant enough inside the differential, the gears or components inside the rear end may need to be replaced.
For purposes of this article, we'll focus on the best recommended methods for removing the old differential gasket, cleaning the housing and installing a new gasket onto the differential. It is highly recommended to inspect the ring and pinion gears as well as axles inside the housing for damage; especially if the leak was significant; before installing the new gasket. For detailed instructions on how to complete that process, consult with your vehicle service manual or contact a rear end gear specialist who can assist you with that task.
Part 1 of 3: What causes a broken differential gasket
In most case, age, wear and tear, or excess exposure to harsh weather and elements causes the differential gasket to break or leak. However, in some very rare cases, excessive pressure inside the rear end housing can also lead to pushing the gasket out which can also create a leak. Under most circumstances, a slow leaking differential won't cause any problems with driving. However, since the oil supply has no way of being replenished without physically adding it to the differential; eventually it can cause serious damage to internal components.
Some of the more common issues that can be caused by leaking rear end oil may include damage to the ring and pinion gears or the axles. If the broken seal is not replaced quickly, excessive heat will build up inside the housing and eventually will break these parts. Although many people don't consider this to be a big deal, rear-end gears and axles can be extremely expensive to replace.
-
Warning: The job of replacing the differential gasket is very simple to perform, but it's a job that should be completed the same day; as leaving the differential housing open and exposing the internal gears to the elements can dry out the seals inside the housing. Make sure you plan to complete this job without delays in the service to reduce damaging the internal components.
Part 2 of 3: Preparing the vehicle for replacing the differential gasket
According to most service manuals, the job of replacing the differential gasket should take anywhere from 3 to 5 hours to complete. Most of this time will be spent removing and preparing the differential housing for installing the new gasket. In order to complete this task, you should raise the rear end of the vehicle and place on jack stands or lift the vehicle with a hydraulic lift. In most cases, you won't have to remove the center differential from the vehicle to complete this job; however you should always consult with your vehicle's service manual for specific instructions recommended by your manufacturer.
In most cases, the materials you'll need to successfully remove the differential housing, remove the old gasket and install a new one will include the following:
Materials Needed
- Can brake cleaner (1)
- Clean shop rags
- Screwdriver(s) flat and Phillips head
- Socket set and ratchet
- Replacement gasket and gasket silicone
- Replacement rear end oil
- Plastic gasket scraper
- Drip pan
- RTV silicone (if you don't have a replacement gasket)
- Torque wrench
- Limited slip additive (if you have a limited slip differential)
After collecting all these materials and reviewing the instructions set forth in your service manual, you should be ready to complete this job. There are many rear-end differentials that are very difficult to find replacement gaskets for. If this is the case for your individual application, there is a way to make your own gasket using RTV silicone that is approved for use with rear end differentials. Make sure you only use a silicone that is approved for use with rear-end oils as many silicones will actually burn when activated with rear-end gear oil.
Part 3 of 3: Replacing the differential gasket
According to most manufacturers, this job should be completed within a few hours, especially if you've collected all the materials and have a replacement gasket. Although it's not required to remove the battery cables to complete this job, it's always a good habit to complete that step prior to working on the vehicle.
Step 1: Raise vehicle on jack stands: In most cases you'll be replacing the rear end differential gasket, as the front end is a transfer case and includes different steps as this. Place jack stands under the rear axles of the rear-end housing and jack the vehicle up so you have enough space to work underneath the vehicle with clearance.
Step 2: Place a drip pan underneath the differential: In this job, you'll have to drain the excess gear oil from the center differential. Place a good sized drip pan or fluid collection bucket underneath the entire differential and outer portions of the housing. When you remove the cover in steps below, the oil will spill in multiple directions, so you want to make sure to collect all of this fluid.
Step 3: Locate fill hole plug: Before you remove anything, you want to locate the fill plug on the differential housing and make sure you have the right tools to remove it; and add new fluid when the job has been completed. In most cases, this plug can be removed by using a ½" socket extension end. However, some differentials require a specific tool. Double check this step before completing the replacement job. If you need to purchase a specialty tool, do so before removing the cover.
Step 4: Remove the fill plug: Once you've determined you can complete this task, remove the fill plug and inspect the inside of the plug. In most cases, this plug is magnetized which will attract metal shavings to the plug. Over time, rear end gears will wear out so it's important to inspect the plug to see if there is a lot of metal attached to the plug. Again, this is a proactive procedure to determine if you should contact a mechanic to inspect the rear gears or if you should replace them.
Remove the plug and then place it aside until you're ready to add new fluid.
Step 5: Remove the differential bolts – except the top bolt: Using a socket and ratchet or an end wrench, remove the bolts on the differential plate starting at the top left and moving left to right in a downward direction. Do NOT remove the center top bolt however, as this will help keep the fluid contained as it begins to drain.
After all bolts have been removed, start to loosen the top center bolt. Do not fully remove the bolt; in fact, leave it inserted half way.
Step 6: Pry the cover off with a flat screwdriver carefully: Once the bolts have been removed, you'll want to start prying the cover off. Be very careful doing this with a screwdriver as you don't want to scratch the inside of the differential housing.
Once the cover comes loose, let the rear end fluid drain from the differential until it drips slowly. After the drips slow down to one every few seconds, remove the top bolt and then remove the differential cover from the differential housing.
Step 7: Cleaning the differential cover: There are two parts to cleaning the differential cover. The first part includes removing the excess oil from the cover. To do this, use a can of brake clean and large amounts of shop rags or disposable shop towels. You'll want to make sure the entire cover is free of all oils.
The second part includes scraping all of the old gasket material from the flat edge of the differential cover. It's best to use a plastic scraper to complete this part of the cleaning as you don't want to scratch the cover.
Once the cover has been completely clean, inspect the flat surface of the differential cover for any pits, damage or bends in the metal. You want it to be 100% flat and clean. If it's damaged at all, replace it with a new cover.
Step 8: Clean the differential housing: Like with the cover, fully clean the outside of the differential housing. However, instead of spraying brake clean on the housing, spray it onto a rag and wipe the housing clean. You don't want to spray brake cleaner onto the gears (even if you've seen in done in a YouTube video).
Also, use the plastic scraper as shown in the image above to remove all debris from the flat surface of the differential housing.
Step 9: Prepare to install new gasket: There are two ways to accomplish this step. First, if you have a replacement gasket, you want to ALWAYS use that for this project. However, some replacement gaskets are hard to find; which will require you to make a new gasket out of RTV silicone. As we indicated above in part 2, ONLY use a RTV silicone that is specifically approved for gear oils.
If you need to make a new gasket out of silicone, follow these guidelines to complete this task:
- Use a brand new tube of RTV silicone
- Pop the seal and cut the end of the tube so you have about ¼" size of silicone coming from the tube
- Apply the silicone in one, consistent bead similar in size and proportion to the image above. You'll want to apply the bead in the center of the cover, then under each hole. Make sure the bead is done in one, consistent application.
Let the freshly applied silicone gasket sit for about 15 minutes before installing onto the differential housing.
Step 10: Installing the differential cover: If you're installing the cover with a factory gasket, this job is rather simple. You'll want to apply the gasket to the cover, then insert the top and bottom bolt through the gasket and the cover. Once those two bolts are through the cover and gasket, hand-tighten the top and bottom bolt. Once those two bolts are started, insert all other bolts and slowly hand-tighten until they are started.
To tighten the bolts, refer to your service manual for the exact pattern recommended. In most cases, using a star pattern is best for rear end differentials.
If you are using a new silicone gasket, the procedure is identical. Start with the top and bottom bolts, but tighten then until the silicone gasket starts to depress onto the surface. You should insert bolts and slowly tighten them evenly to distribute any air bubbles in the silicone gasket. DO NOT FULLY TIGHTEN THEM IF USING RTV silicone gasket.
Step 11: Torque bolts to 5 lb. pounds or until RTV starts to push through: If you are using a silicone gasket you made with RTV silicone, you want to tighten the bolts in a star pattern until you start to see the gasket material push through the differential seal. The bead should be smooth and consistent around the entire housing.
Once you've reached this phase, let the housing sit for at least one hour to dry and secure the silicone gasket. After one hour, torque all bolts in the star pattern to the manufactures recommended specifications.
Step 12: Fill differential with new gear oil: Using the recommended gear oil for your vehicle, and using a rear end gear oil pump, add the recommended amount of fluid. Usually it's about 3 quarts of fluid, or until you start to see the fluid slowly spill from the fill hole. Once the fluid is full, wipe off excess gear oil with a clean rag and tighten fill plug to recommended torque specs.
Step 13: Lower vehicle from jack stands and remove all materials from under your vehicle Once you've finished this task, your rear end differential gasket repair is done. If you've reviewed the steps in this article and are not confident completing this project or need an extra set of professional hands to help fix the problem, contact YourMechanic and one of our local ASE certified mechanics will be happy to assist you replace the differential gasket.